STEP 1: Adding a new Category + Image in the Admin Dashboard
- Go to Catalog > Categories and you will see a list of Categories.
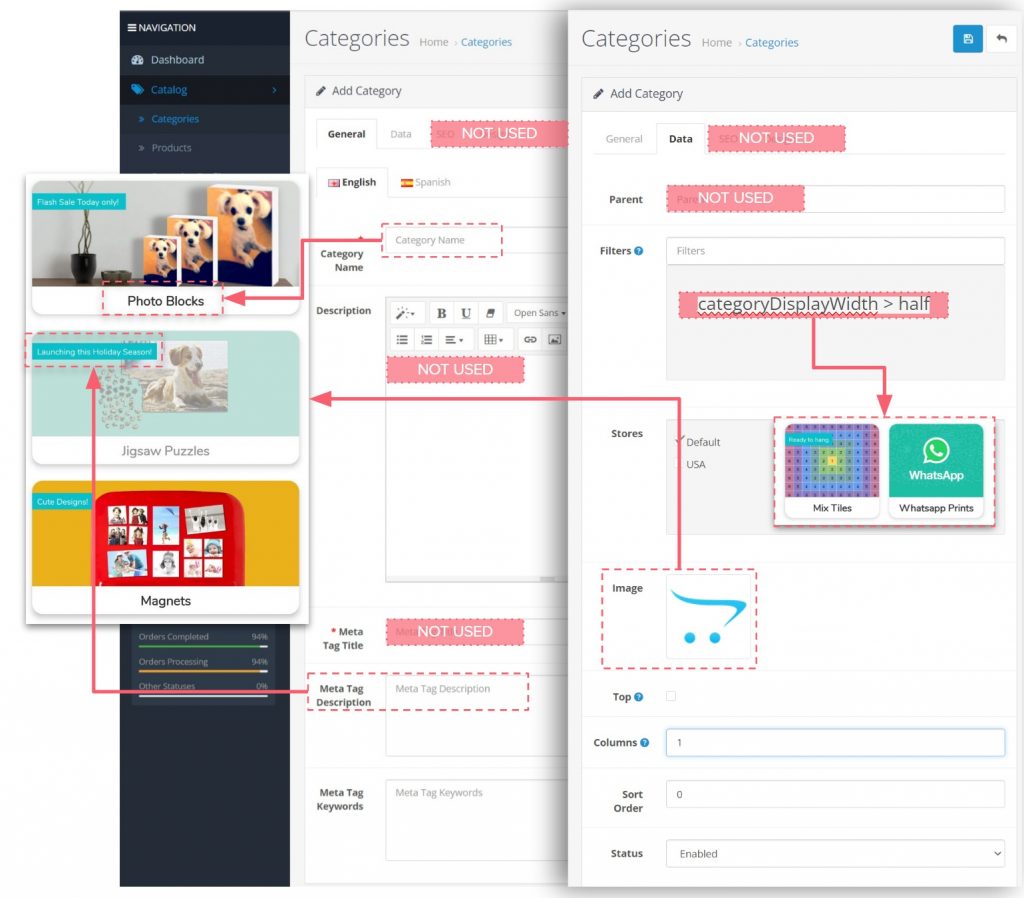
- Click on the + button at the top right corner to get to a new blank Category form.
- There are FOUR tabs in this form. We only need to use the left two of them: General and Data.
If your app is multi-language, then you will repeat all the below for all languages in their respective tabs in the form.
- General/Category Title: this shows up as the text label under the Category image
- General/Meta Tag Description: shows up as the Ribbon Text. This is optional, and has obvious character limits if you intend for your Category to be half-width when in Vertical Scroll mode.
- Everything else on this tab is not used at this time. Go on to the Data Tab.
- Data tab/Filters: see the tutorial on filters here for an in-depth discussion on how to use this feature to hide products. But for setting up and display purposes of a Category, there is one “filter” that you need to know about. (think of it as a <Property> rather than a “Filter”). “categoryDisplayWidth>half”. If you add this, then this Category will show up in a square format. This format is only available if your home screen is set to Vertical. (Categories->Filters->homePageDisplayStyle->Vertical) To learn how to do this, see the the “Welcome to your Home Screen” tutorial.
- Data tab/Image: click on the thumbnail and then the blue Pen Icon to enter the Dashboard image library. Find the image for your Category (or upload a new one) here. Make sure to read the “How to prepare images for the Home Page” tutorial.
- Data tab/Top: Checking Top will make this Category appear in the primary row of a two-row Horizontal scroll Home Screen mode. (has no effect in the Vertical Scroll mode).
- Data tab/Columns: unused.
- Data tab/Sort Order: determines the position it will appear in vs all other Categories. Larger number goes further down in the Vertical Scroll home screen (or more-right for a Horizontal Scroll mode). This is also described in the “Welcome to your Home Screen” tutorial.
- Data tab/Status: this is important. For it to show up, it needs to be “Enabled” (default). Special note about “Status”: If you need to totally remove an entire Category from circulation when it becomes obsolete, you should use this feature to simply “disable” it (instead of Deleting it completely) as Deletion is destructive and irreversible.
STEP 2: OC Configuration Sheet
IMPORTANT! (NEW FROM ~AUG 2022)
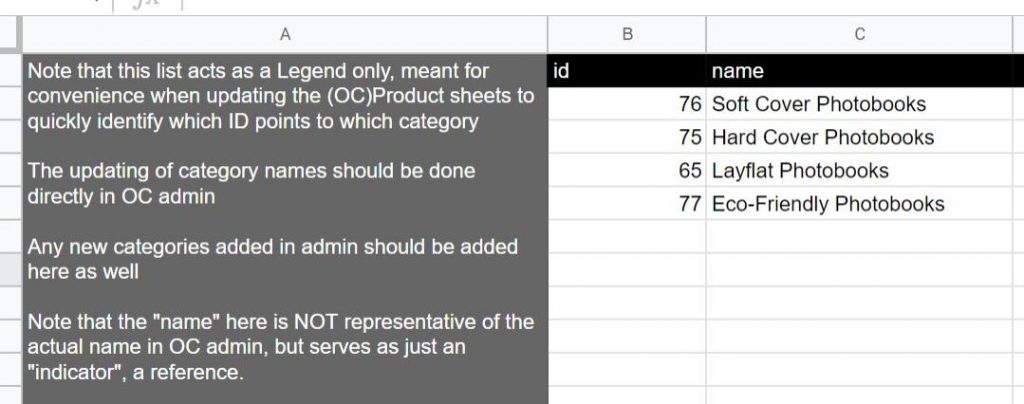
Now that you have created a new Category on your dashboard, go to your Official Configuration Sheet, and create a new entry in the Worksheet called “(OC) Category Legend“.
Give it a unique number (something not used for any other category) and an indicative name (this name is not used anywhere, and is merely for your reference when you are editing the main OC Products tabs. The actual string used in your App will be what you entered into the Dashboard panel )
Later when you set up products and want to park them under this new Category, you will cite the actual Category name you used in Step1 above, along with the Category ID (number) that you added in Step2 here.