

How to get a new Product to show up in the App
In this tutorial you will learn how to setup new products from scratch starting from getting them recognized by GPS to inputting the relevant information into OC for it to show up and what attributes show up where.
What is GPS and OC?
Products in the app needs to be defined in TWO separate spreadsheets.
GPS (Global Print System) contains the physical production aspects of a Product from the PSP’s perspective. These are stipulated by the PSP (Print Service Provider). Details like substrate dimensions, bleeds, book spine calculations, crop marks etc. are configured here.
OC (OpenCart) holds product information from the sales perspective. These will contain information like Name, Descriptions, Pricing, Product images etc.
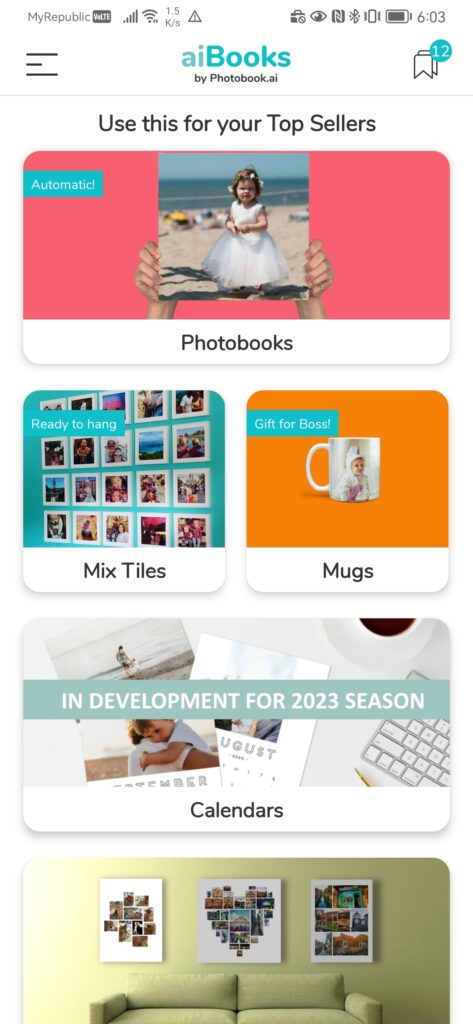
What goes into the OC Sheet and what is set directly in the Dashboard?
Everything AFTER this screen that are product-related are configured in the OC Sheet in Google Sheets format. You can of course, also configure them directly within the dashboard if you only want to change a couple of items. But just know that once the Sheet is imported, it will overwrite whatever is in the product database with the last-imported values by matching the “model” in each row of the OC Sheet.
For everything else in the App, like Home Screen display styles and Product Categories, Category landing pages, and uploading of images, do it directly in OC Dashboard (via a Web browser)
GPS Products Sheet
99% of the specs in this sheet will be filled out by us during the PSP Integration Phase (R0). This can include details and specs like whether we should render crop marks for each page? Where should these crop marks be? Do we present the Cover of a book in 3 parts (Back-Spine-Cover) or a single large PDF (or JPEG?)
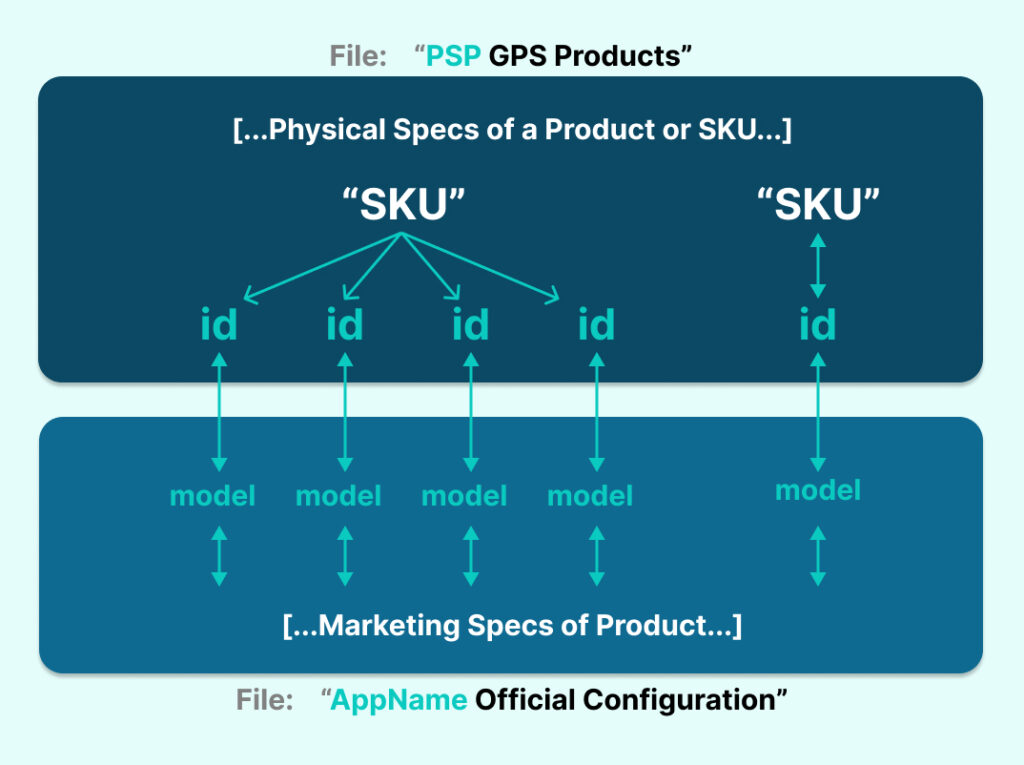
The 1% you will mostly be using is to link an ID to a SKU.
SKU is the article code stipulated by the PSP. This is the KEY thing their systems recognize. It can be any alphanumeric string and is case-sensitive.
In the GPS Sheet, we declare new product “id”s which map to a SKU. These ids are then repeated in the OC Sheet wherein they are labelled as “models”. (we opted for different names so that we know which “product ID” you are talking about. If it’s “ID” then its in the GPS sheet, if its “Model” then it’s in the OC Sheet. They must be alphanumeric and ONLY lower-case.
A single SKU can have multiple ids; a classic example is the 4×6 print with or without white border is essentially the same SKU for a PSP. But for OC, it needs to be two products, so we declare two IDs in GPS which will map to two Models in OC.
OC Products Sheet
Once the Product is configured in GPS, make a corresponding entry of its “id” into the “model” column. They MUST match EXACTLY.
For each model, you then fill up sales and marketing information which will then affect how they are present in the app, the prices, discounts, etc.
There are close to over 80 properties and attributes (columns) in a typical OC sheet.
Each version of a Product will have its own row (except for 90deg rotated versions; our system does not require you to create two rows of them for a Landscape version of an upright product)
But each variant requires a row. Eg: a photo print with 3 choices of frames (White, Black, Wood) and two choices of paper (Gloss/Matte) will require 6 rows. (1x3x2). So 10 sizes of photos will require 60 rows to be setup! And if you add a variant with and without a passepartout or paper mat, in the frame then it becomes 120 rows. This ensures that you have micro-control over each and every product variant.
From Sept 2023 we also support product bundles which groups a printable product (like a print) with non-printable products (like a frame and gift box). These are defined in GPS. Look out for more info in an upcoming tutorial.
GUI Elements and how to set them up.
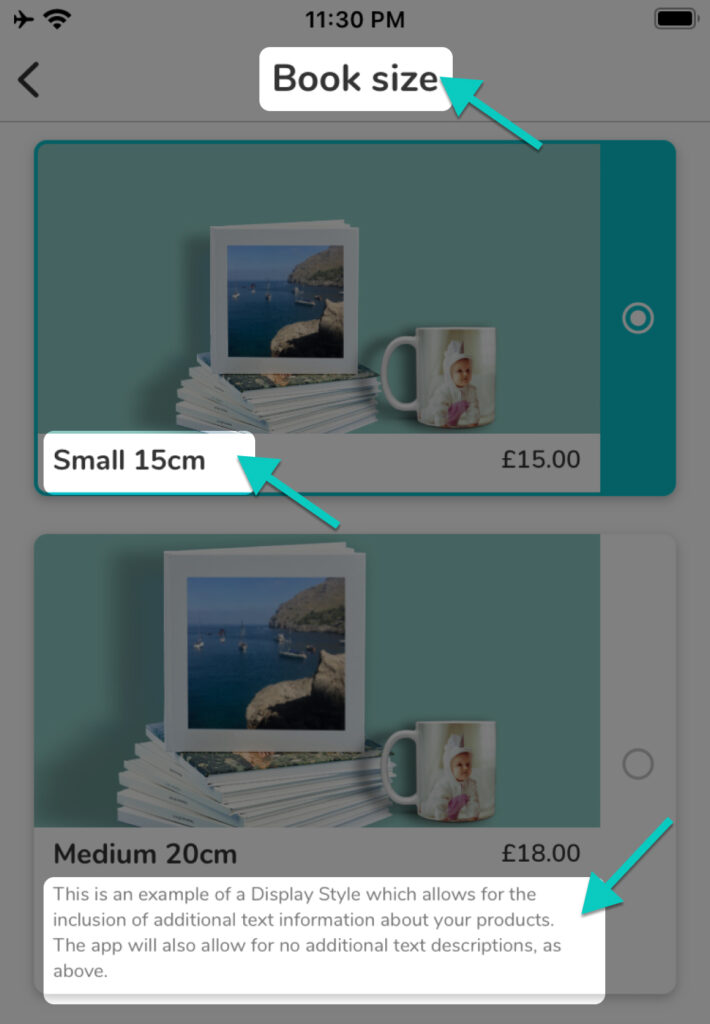
This screen is called a “subCategory” screen. It can be one of upto 8 supported subCats (we typically stop at 3, at most 4 levels).
You will see something like this in your OC Sheet:
attribute:subCat_2
{"type":"Book size", "name":"Medium 20cm", "thumbnail":"mediumphotobook.jpg", "description":"This is an example of a Display Style which allows for the inclusion of additional text information about your products.  The app will also allow for no additional text descriptions, as above", "order":101, "tag":"", "displayStyle":"listWithHero" }
- Book Size –> “type“:”Book size”
- Name of the product –> “name“:”Small 15cm”
- Blurb about product –> “description” ; use \n to force a new line within the “” quotes. Avoid the symbol for inches, which is also a ” instead use this character instead.
- Product Image –> “thumbnail“:”enter filename with extension here”
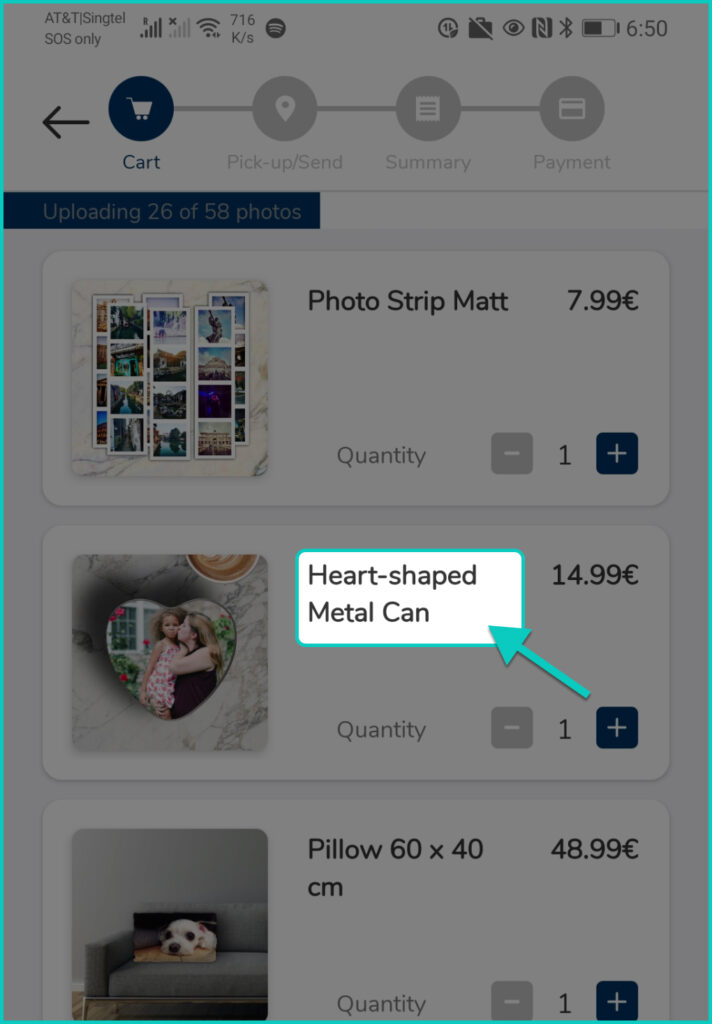
Once you come into the shopping cart, the app will use the name_en property of that “model” in your OC sheet as the label for the product when it exists in the shopping cart.
This is also the name which you see when you log into the dashboard. So each “model” (row) will ONLY have ONE name. (as opposed to “name” property in the subCat attributes of the product…you will have as many names as there are sub-cats)
TIP: Keep this name short as there is limited space in the cart. So instead of “Hardcover Matt Laminated 30mm x 30mm Square Photobook”, consider naming it “30mm Sq. Hardcover Matt”. You can use any one of the subCategory name fields to describe your product in detail.
The image is the “preview thumbnail” under “attribute:preview” or “attribute: overlaysPreview” which will be dealt with in another tutorial.
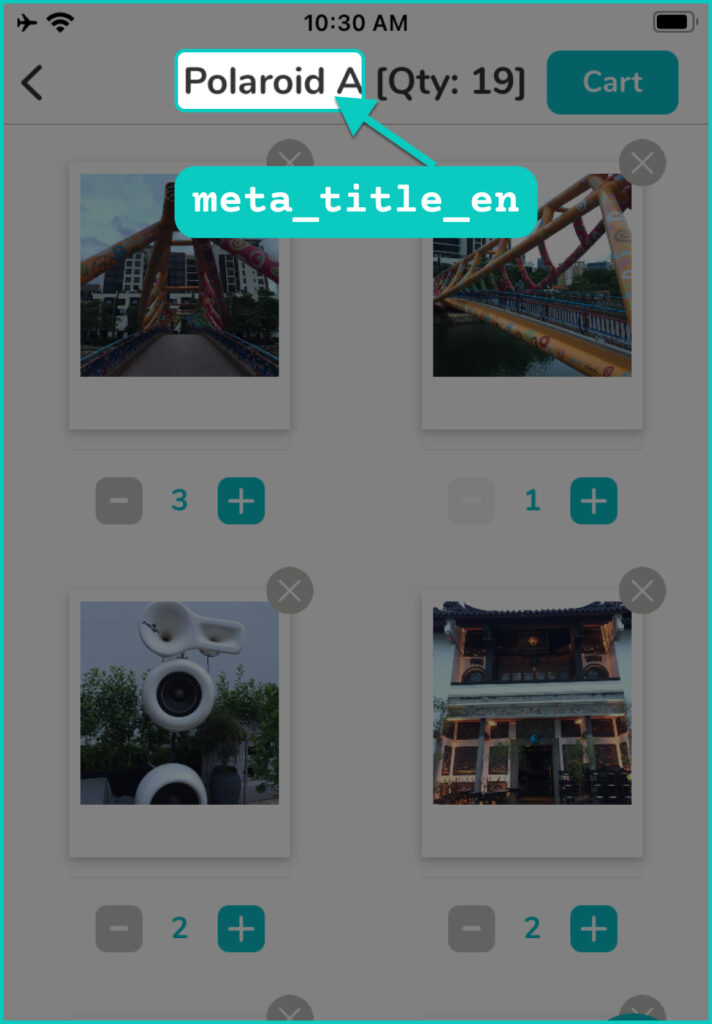
For Prints and other high volume products, we have a special UI screen to enable quick ordering of multiple copies of each photo. This one has a limited space for the product name at the title bar area.
This title bar will pick up the name you write in the meta-title property.
Read more about how to set up Quik Prints for any product here.
Special: Product Landing Page
When you link a banner-ad to a single product “model” AND, if this particular product is nested within a subCat with a lot of other products in the same family, the App will create special “landing page” for just one single product.
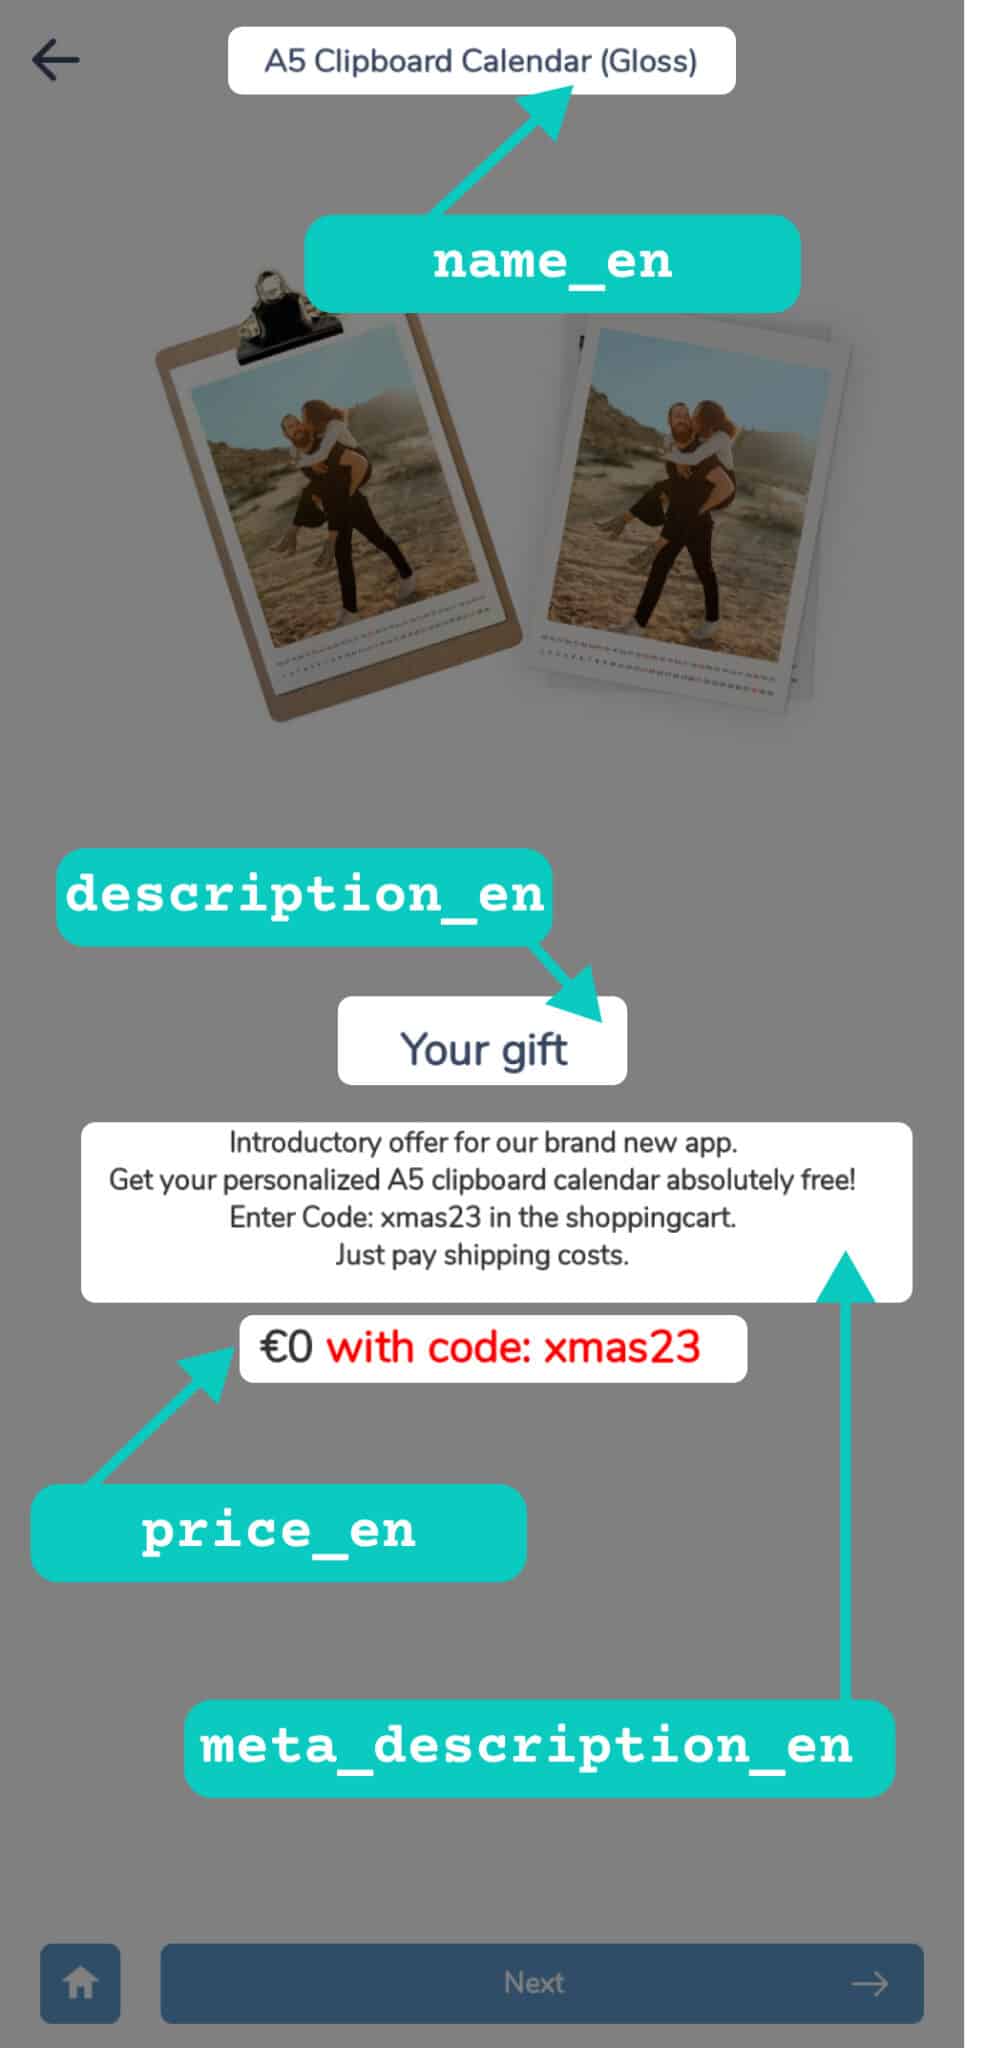
There are 5 elements that makes up this auto-created screen:
- The image is the image field (filename.jpg)
- Title Bar at top of the screen will use the text in “name_en“
- Promo Title of that page “Your gift” comes from “description_en“
- Body blurb comes from “meta_description_en“. You do not need to use \n to force a line break in this case. Use “alt-enter” in googlesheets to add linebreaks. This is because this is a standard field in OC, not a custom attribute we created (which will hold text within ” ” quotes)
- The price shown here, despite looking like it’s a sentence, is actually all defined within the “price_en” JSON snippet. The words after the numbers are the “suffix” and the Euro symbol (or $) is automatically added depending on the market_id that the app is current running in.
Shopping Cart Images
Shopping cart product images will render user’s chosen image on the product to give as close a depiction to how it will look like when manufactured and delivered. The set-up of this image can come from various places.
Typically, they are defined as a “Preview Thumbnail”. There are two generations of the Preview feature called MOPv1 and v2. (MOP = Masks-Overlays-Previews)
MOPv1: this is the default when the attribute:mop column is left empty. This image is defined in the attribute:preview as the “thumbnail“. We are deprecating these in 2024.
MOPv2 this will be defined in attribute: overlayPreviews and is also the “thumbnail”. In v2, this image is auto-generated together with any masks (like the heart shape) shadows and thumbnail background image. You can define an image (JPG) or HEX Color for the background of this image in the cart screens.
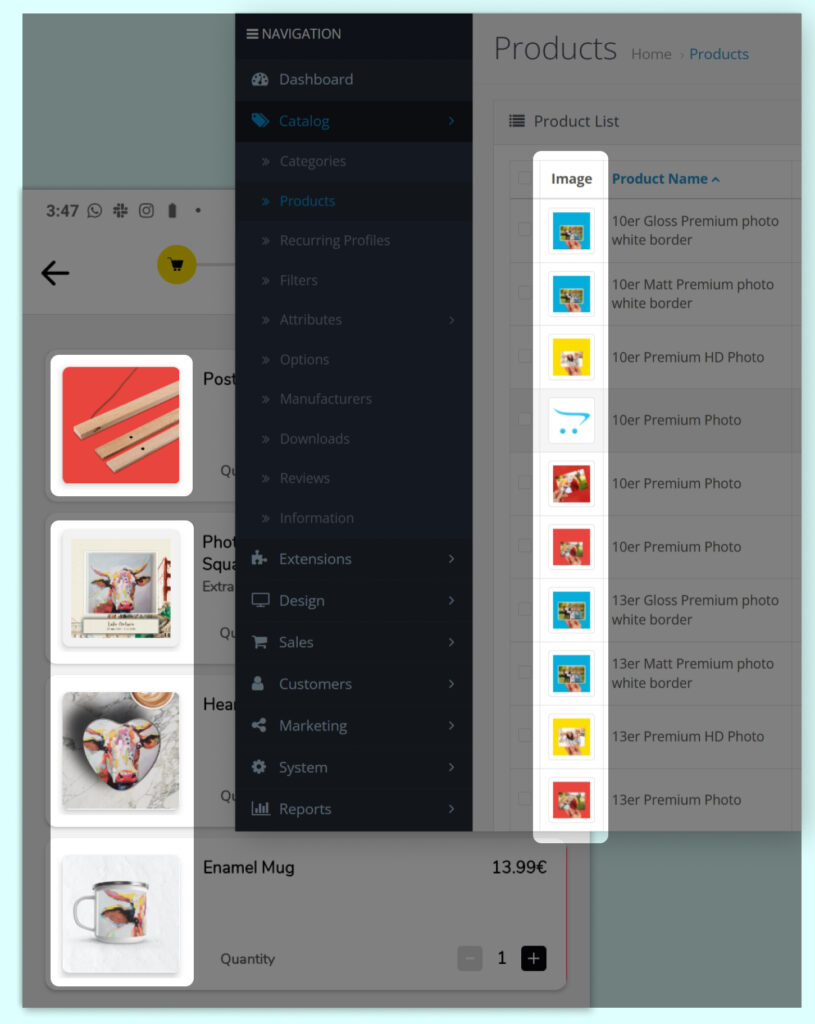
If nothing is defined, the app will fall-back on using the “image” property in OC. This is also the image that will show up when you list your products in the dashboard.