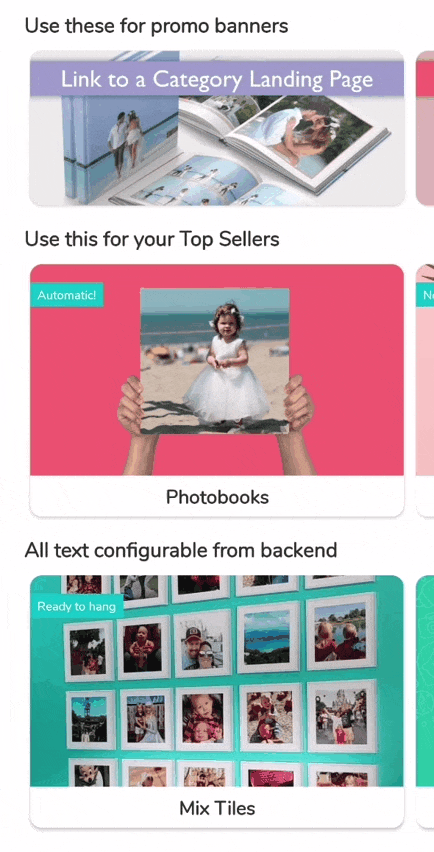
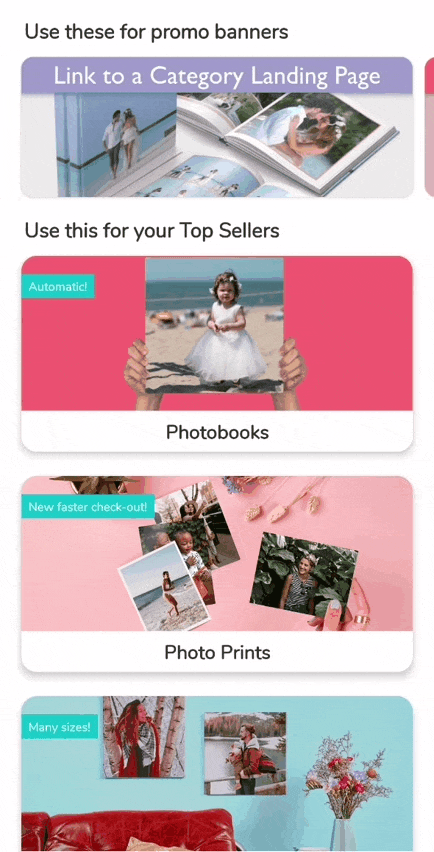


The Promo Banner is a horizontally scrolling element always on the top of your Home Screen.
For the Vertical Mode, it will scroll out of screen when user scrolls up.
For the Horizontal Mode, it will always remain in place.
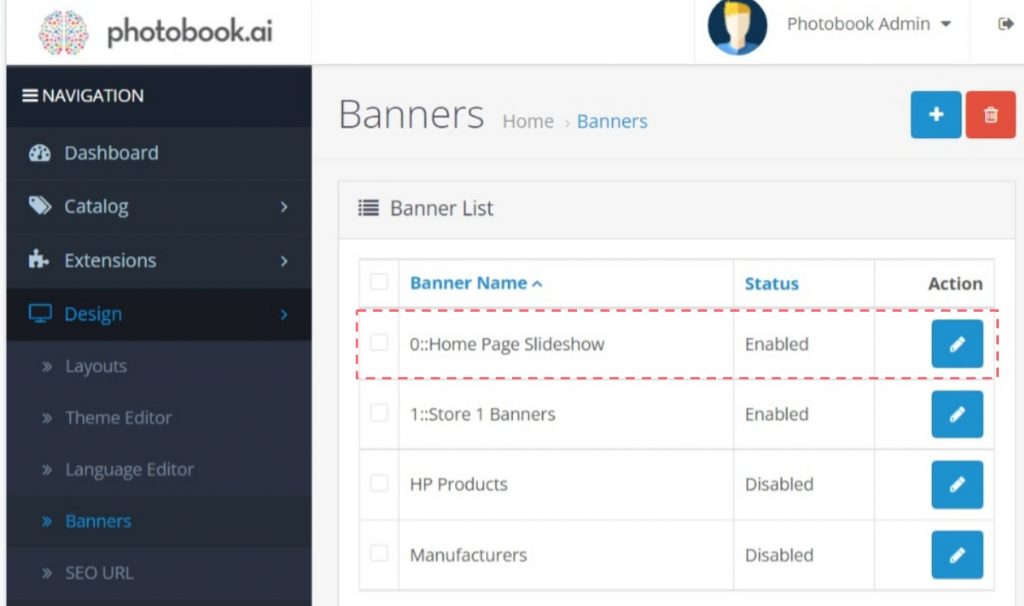
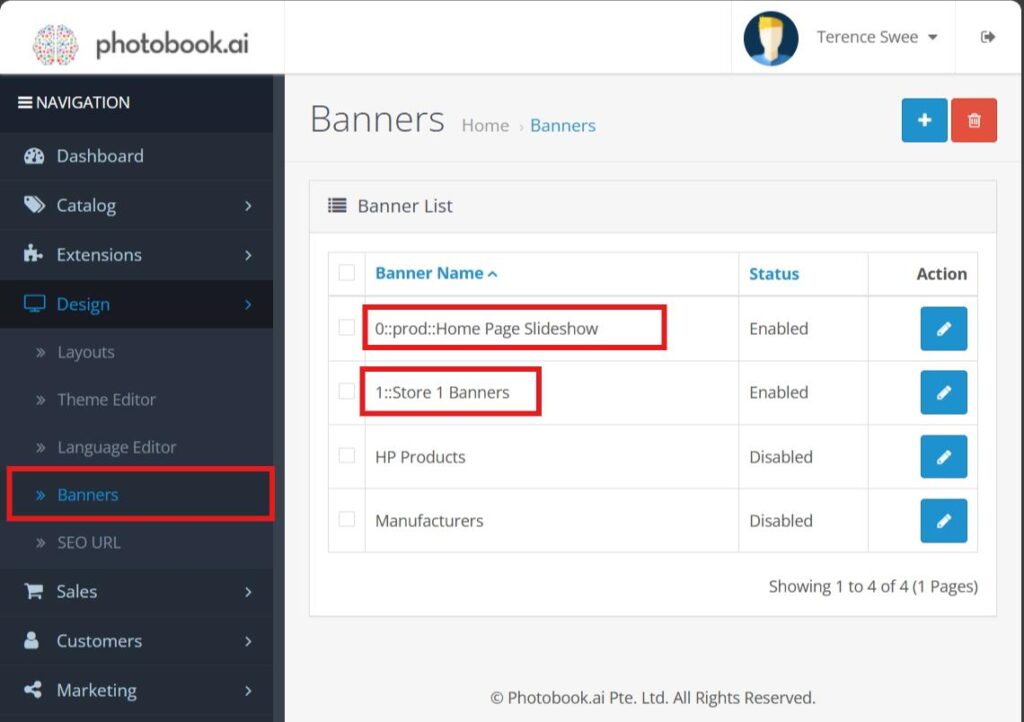
Go to Design > Banners and look for “Home Page Slideshow“.
Make sure it’s status “Enabled”. Click on the blue Edit icon on the right.
When in the Edit screen, you should see at least one Banner being setup for you.
If there are none, click the blue + button (bottom right corner).
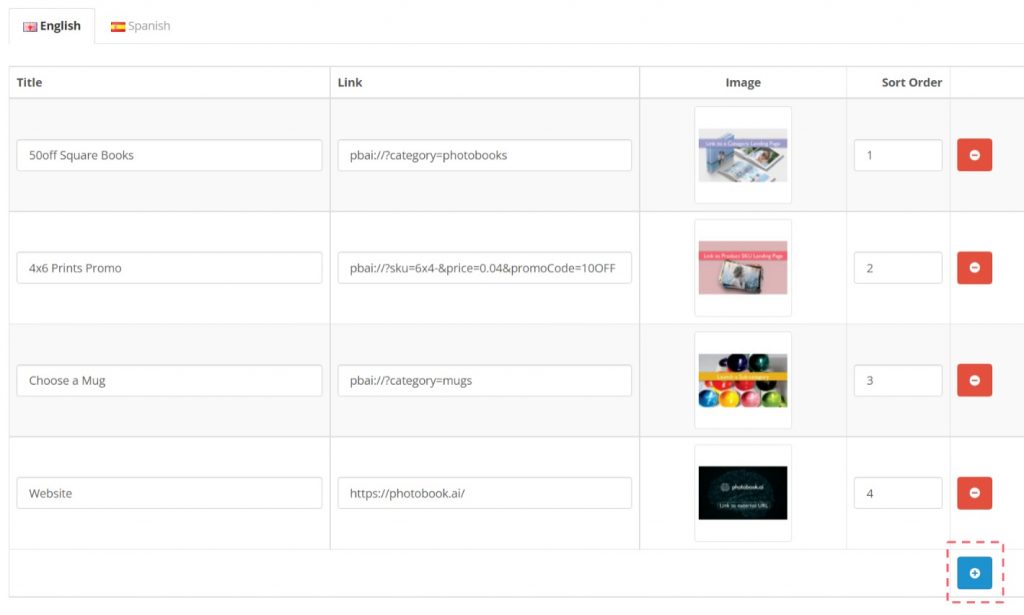
Add a Banner image and a Title. Titles do not appear anywhere in the app. Jump here to learn how about Banner Images sizes.
Set the Left to Right Sort Order (smaller number is Left).
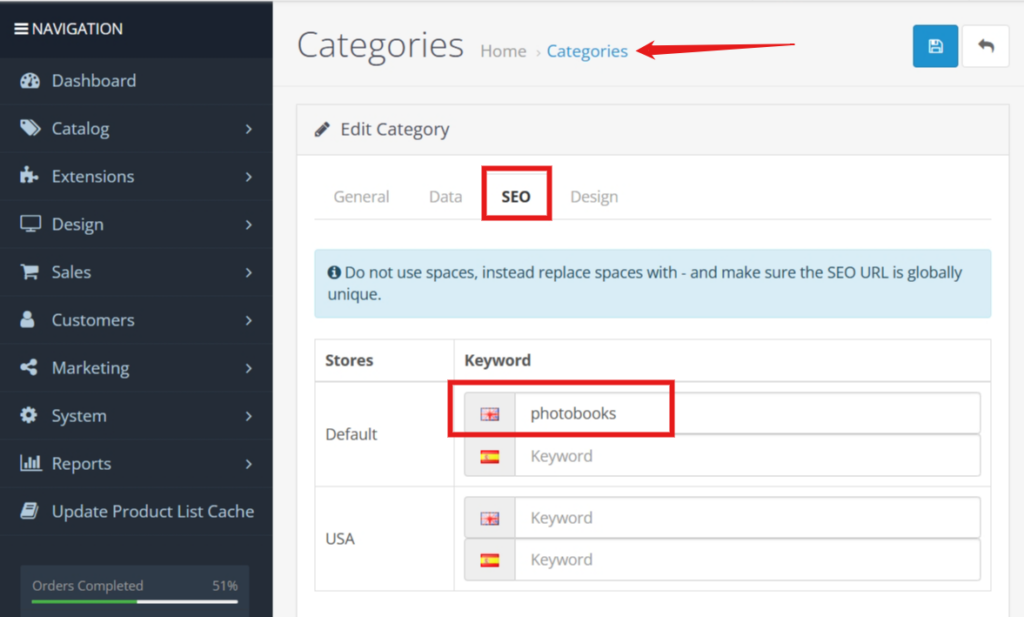
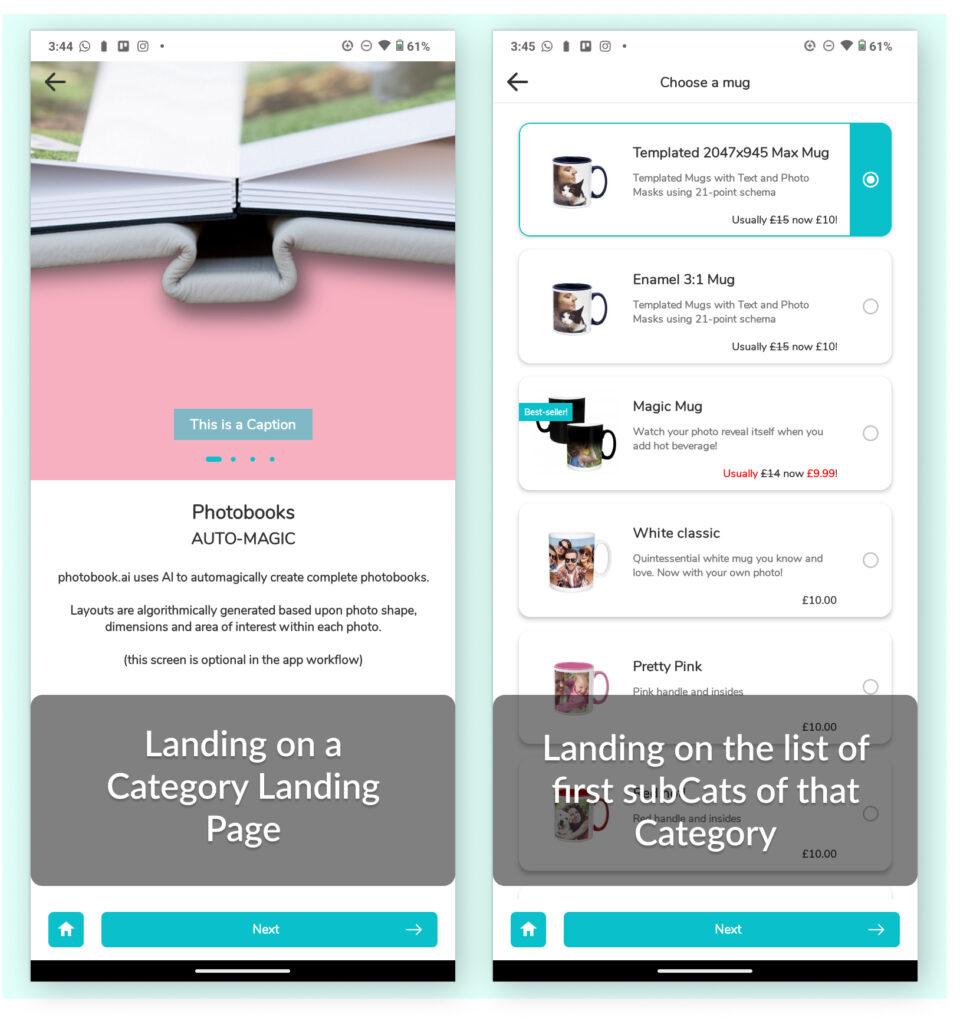
To set the banner to launch a Product Category, replace the blue-text with the category slug that you want to link to. This must be the same slug that is set up in your Catalog > Categories>SEO tab.
pbai://?category=category_slug Note: if you have setup a Category page, then it will launch that Page. If the Category does not have a “page”, then it will launch the next screen, which will be typically the list of Products in that Category.
To launch any particular product (like a 4×6 Print in this example) copy and paste the code below and change the blue-text to the Model that is used in OC. NOT to be confused with the SKU property which maps to the PSP’s article codes.
pbai://?sku=6x4-
There is an option to directly apply a discount for this SKU by adding the code below:
pbai://?sku=6x4&price=0.04&promoCode=10OFF
Note that the “promoCode” must be the same label that you have created in the Marketing > Coupon section. (learn how to create promo codes here)
If you only want to limit a discounted product to users who discover it via the Banner, then you define a promoCode (coupon) and the price in the URL.
If you want the promotional price to be effective from anywhere on the app, then you fix the price in the product’s price JSON snippet and only link the Banner to that “model” of the product, as a simple path for users to get to the particular promo product.
Warning: We do NOT recommend launching a webstore, as users will have to upload every single image before editing, and also transact and pay “outside” of the app, although they may think that they are transacting within the app. Orders they make through your webstore will not show up in the Order History of the app. This has shown to create confusion and customer service problems.
NEW from February 2024 (requires app update)
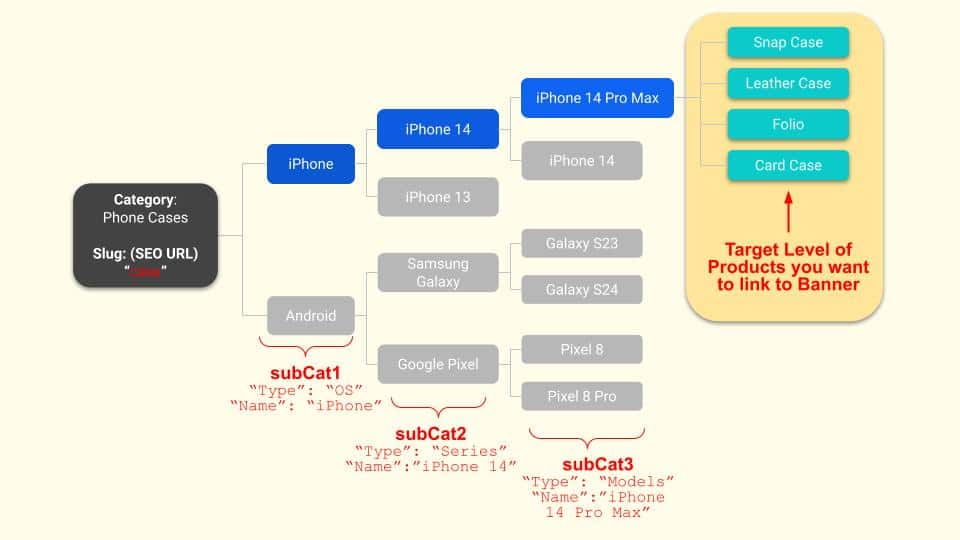
This is useful if say you want to promote phone cases for the latest iPhone 14 Pro Max models ONLY. In this “subCat” of phone cases, you may have a handful of various phone-cases, like the snap-case, folio, leather etc. But the iPhone 14 Pro Max is nested in a tree 3-levels down that looks like this:
The Code to do this looks like this:
pbai://?category=cases&subCategory=iPhone/iPhone%2014/iPhone%2014%20Pro%20MaxSome key notes:
1) Similar to launching a Category, the string to use is the slug (see example on Category above)
2) For subCategory property, the string to use is what you have listed as the “name” property in your attribute:subcat1 JSON.
3) Because this is a URL, any spaces in your label are encoded to ” %20 “
4) If you have a multi-language OC, then the “name” could be different for each language. Remember to fill up the various language links for the banner ads accordingly.
From April 2024, we will progressively roll out this additional refinement to all client’s white-label apps badged v3.7 and above. These additional query parameters in the URL of the banners can be appended to any of the 4 behaviors shown above, by simply adding an ampersand “&”.
If you have a multi-market app, you will now be able to define promo banners groups for each {Market} within your OC dashboard.
You will also now be able to create banners within the staging environment {dev}. This is useful if you have a new set of products launching and they are all queued up in dev as you refine pricing and marketing languages/images. Now you also want to announce it with banners. Now you can set them up in dev and test.
To do this, create a new banner and in it’s “name” field, use this format:
Most campaigns start at the stroke of midnight and may end a few minutes after…just to take care of customers who may have added their purchases to cart just before midnight.
So now your marketing team do not have to wake up at midnight to hit the launch button. We have added ability to set parameters &start and &end times to banner behaviors. This additional parameter is optional and can be added to any of the URL formats above in the 4 different scenarios. As we have clients in all time zones which has daylight savings, the time format is in UNIX Epoch time in seconds. Use any online epoch converters or use this: https://www.epochconverter.com/ (note that this one uses GMT as input, so please adjust accordingly)
&start=1735084800&end=1735689599when appended to a link to announce a new single product SKU for example:
pbai://?sku=6x4&price=0.04&promoCode=10OFF&start=1735084800&end=1735689599
In the Vertical Mode, Banners are fixed to an aspect ratio of 5:2; so given most phone screen sizes are around 1080px in width, that means you should prepare an image that is 1080 x 432px.
HOWEVER, if you should expect to ever need to change your home screen layout to the Horizontal Mode in future, then you should cater for a taller image. (read on)
The top 25% of available screen height is for Promotional Banners, and the remainder 75% is split into 2 equal rows for the Categories. The promo banner will be slightly taller than 2.5:1 as you can see in the side-by-side comparison above.
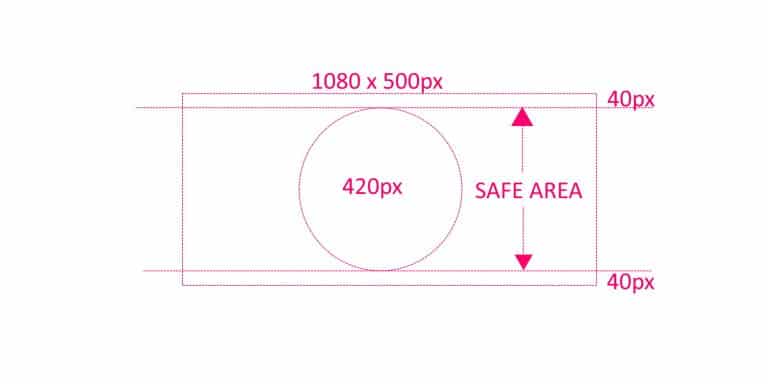
To ensure your banner works in all cases and phones, prepare them as below:
1080 x 500px with a 40px vertical safety margin
photobook.ai uses AI to automatically create photobooks and other printable products. We provide white-labelled native mobile and progressive web apps to ecommerce and print suppliers. Through our network, we fulfill print products globally for clients who want to produce closest to their customers to reduce their carbon footprint and yet be competitive in their offering.