We currently support 2 tiered pricing models and various ways of embellishing how to display the price property of any product. Read on to find out how they work and how to formulate the JSON that is required.
We support 2 Tiered Pricing Models
Photobook Model
The classic photobook model pricing inspired by how photobooks are priced, but applied to a variety of Multi SPSS/MPSS products that typically gets sold in bundles of multiple copies like Box sets of 4×6 prints, Mixtiles type wall decor and Magnets .
This model lets you create a base bundle of N “pages” and define the incremental cost of each additional “page”. So you can sell “$50 for first 3 mixtiles, and just $10 for an additional one.
First remember to set attribute:basePages:3 so that the App knows the base unit is 3 pages for $50
Then in the attribute:price JSON, this is the code snippet example:
					[
    {
    "prefix":"First 3 Tiles ",
    "price":50.00,
    "suffix":", $10 ea. thereafter",
    "extraCostPerPage":10
    }
]
Multi-tiered Model
The multi-tier price model is most commonly used to sell Prints where you encourage users to buy more prints to access lower per-unit prices.
Update 1: Dec 2023: taking on feedback from clients, we have suppressed showing each tier as a product card and will instead only show the lowest price. You are encouraged to add a prefix “from” before the price.
Update 2: Nov 2023 we introduced Gifts and Subscriptions which also allows users to pre-pay to lock in a high-volume price point without having to make decisions on the photos they actually want to print in a single session.
Below we show the JSON code snippet for the first volume-price bracket.
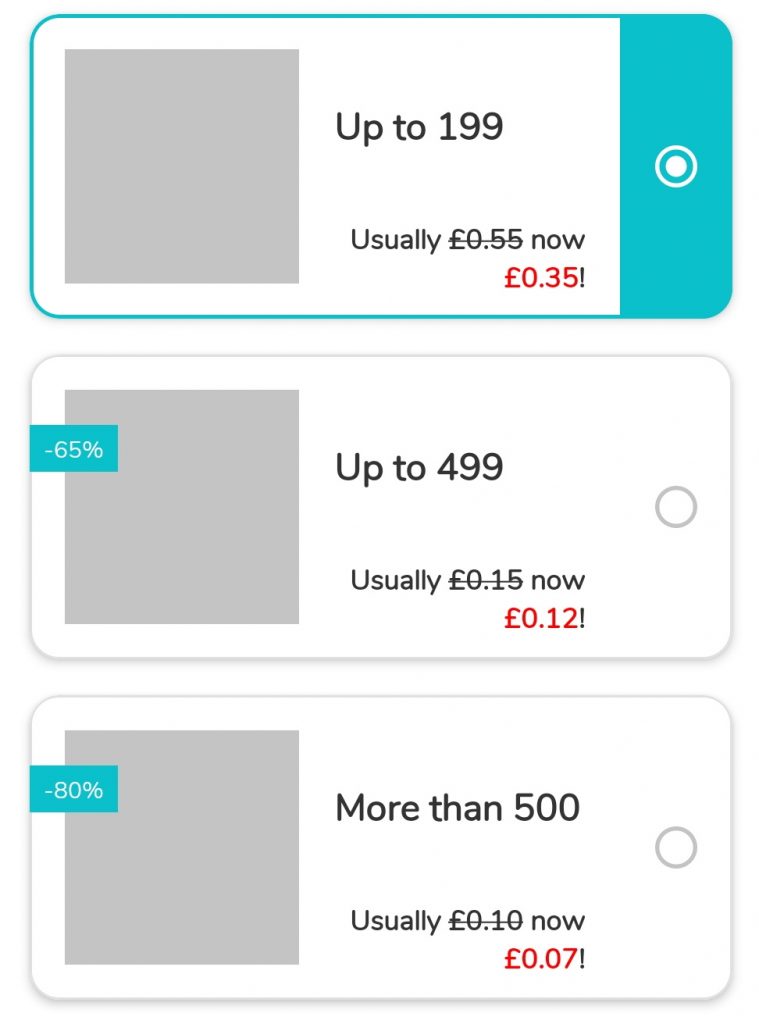
You will see the Min and Max are set to 1 and 199, with the corresponding number of photos required. Some products may require 2 photos per “page”. In those cases, then you would have a different value for “photos”.
You will see the chunk of code for “display” is the one that effects that nice promo-slashed price display so common in e-commerce apps.
					{
  "name":"Up to 199",
  "price":0.35,
  "amount":1,
  "thumbnail":"Prints-pack-individual.jpg",
  "suffix": "each",
  "min":{"pages":1,"photos":1},
  "max":{"pages":199,"photos":199},
  "display":{
             "value":"Usually £0.55 now £0.35!",
             "colors":[{"color":"#FF0000","values":["£0.35"]}],
             "strikethrough":["£0.55"]
             }
},
Now for the second bracket, we introduce a new element. The side-ticker tape “discount”. In this case it’s “-65%” which then forces the UI to show up a side ribbon indicating the % discount. This does not have to be a number. It can also say “Best value” or “Popular”.
					{
  "name":"Up to 499",
  "price":0.12,
  "amount":200,
  "discount":"-65%",
  "thumbnail":"Prints-pack-200.jpg",
  "suffix": "each",
  "min":{"pages":200,"photos":200},
  "max":{"pages":499,"photos":499},
  "display":{
             "value":"Usually £0.15 now £0.12!",
             "colors":[{"color":"#FF0000","values":["£0.12"]}],
             "strikethrough":["£0.15"]
             }
},
Now for the third bracket, we still need to set some kind of max. In this case, we set it to 1000. This is important as this information is passed to the Photo Picker which will then enforce the user to pick at least 500 and no more than 1000 photos.
We want to bring your attention to the final curly bracket. It does not have comma after it as it’s the last chunk before we frame them all up with square brackets [ ].
					{
  "name":"More than 499",
  "price":0.07,
  "amount":500,
  "discount":"-80%",
  "thumbnail":"Prints-pack-500.jpg",
  "suffix": "each",
  "min":{"pages":500,"photos":500},
  "max":{"pages":1000,"photos":1000},
  "display":{
             "value":"Usually £0.10 now £0.07!",
             "colors":[{"color":"#FF0000","values":["£0.07"]}],
             "strikethrough":["£0.10"]
             }
}
Finally to put this all together, you would frame the entire chunk in square brackets, then separate each price bracket code block (starting with “name”, ending with “display”) with a comma.
Take note that the last chunk will NOT have a comma after it’s closing curly } closes the chunk, since it’s the last in the line.
So if you have 10 price brackets, then just replicate these chunks 10 times, separate by commas.
					[
{
  "name":"Up to 199",
  ...bla bla bla
},
{
  "name":"Up to 499",
  ...bla bla bla
},
{
   "name":"More than 500",
   ...bla bla bla
}  // no commas after last chunk!!
]
About the "pack":"multiplier" property
Due to legacy reasons, we had to introduce the “multiplier” feature to support MPSS products (Multi-Photos-Single-Surface) because prices used to be tied to photos rather than pages. So in a Collage Wall Decor product, for example, if it’s a 3-photo collage, then your multiplier ratio is 1 divided by 3 (0.3333). This is an outdated concept that we will deprecate in 2024.
This is how your JSON will look like:
					[
    {
    "prefix":" ",
    "price":50.00,
    "pack":{"multiplier": 0.3333333},
    "suffix":" "
    }
]
So where does all this code go to? In your OC Product Configuration sheet, this entire chunk will go into [prices_raw_en] typically in column AY.