Setting up the User Journey of selecting products and their sub-types
Core Concepts of our Product Management system
Each SubCatis a “Screen” Each SubCatlevel is akin to a “step” or screen in the wizard driven UX of your app. At each screen or step, you are asking the user to make a choice between several possible product “Attributes”.
“Type” assigned to a SubCatis the Title Bar of that screen.
Only different JSONs matter. In each SubCat, if there are identical “Type” and “Name”, they will only appear once. (more details follow below)
Each screen should use the same “displayStyle” All attributes on the same screen or level (but not necessarily the SubCat), must use the same “displayStyle”
Case Study: Wall Decor Setup
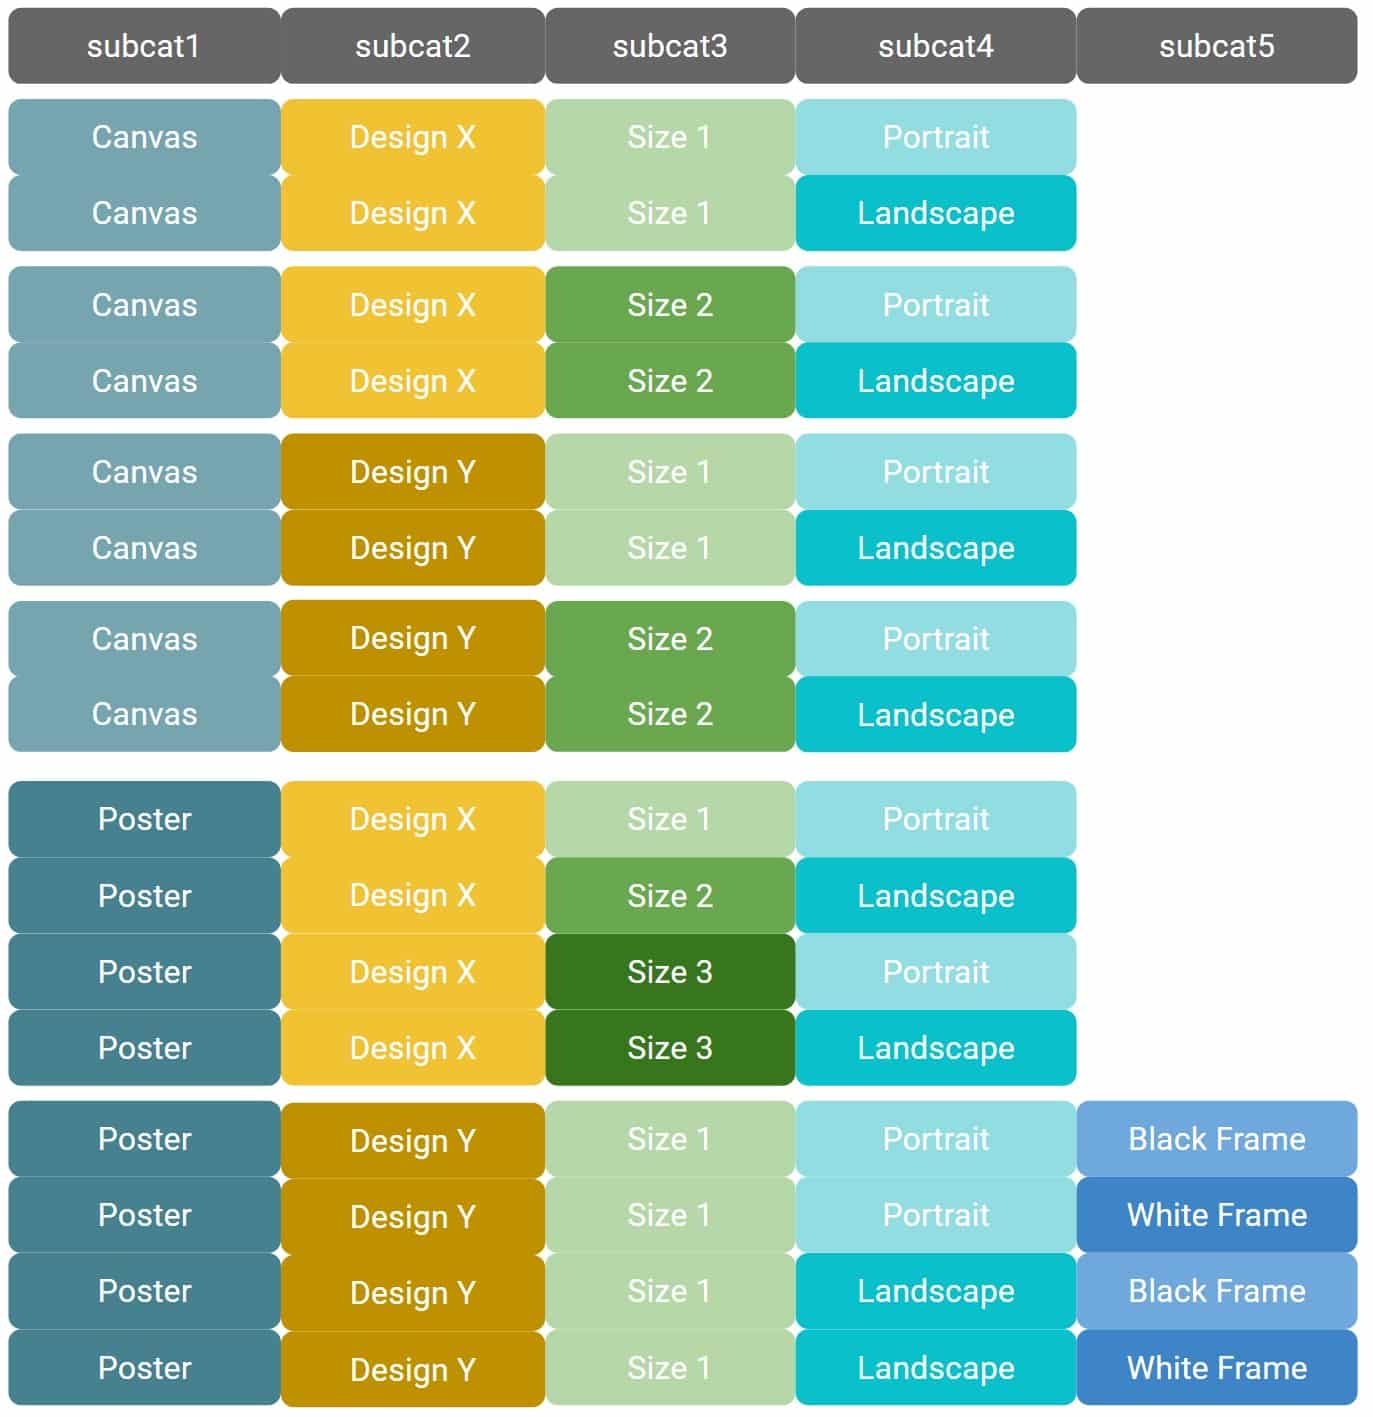
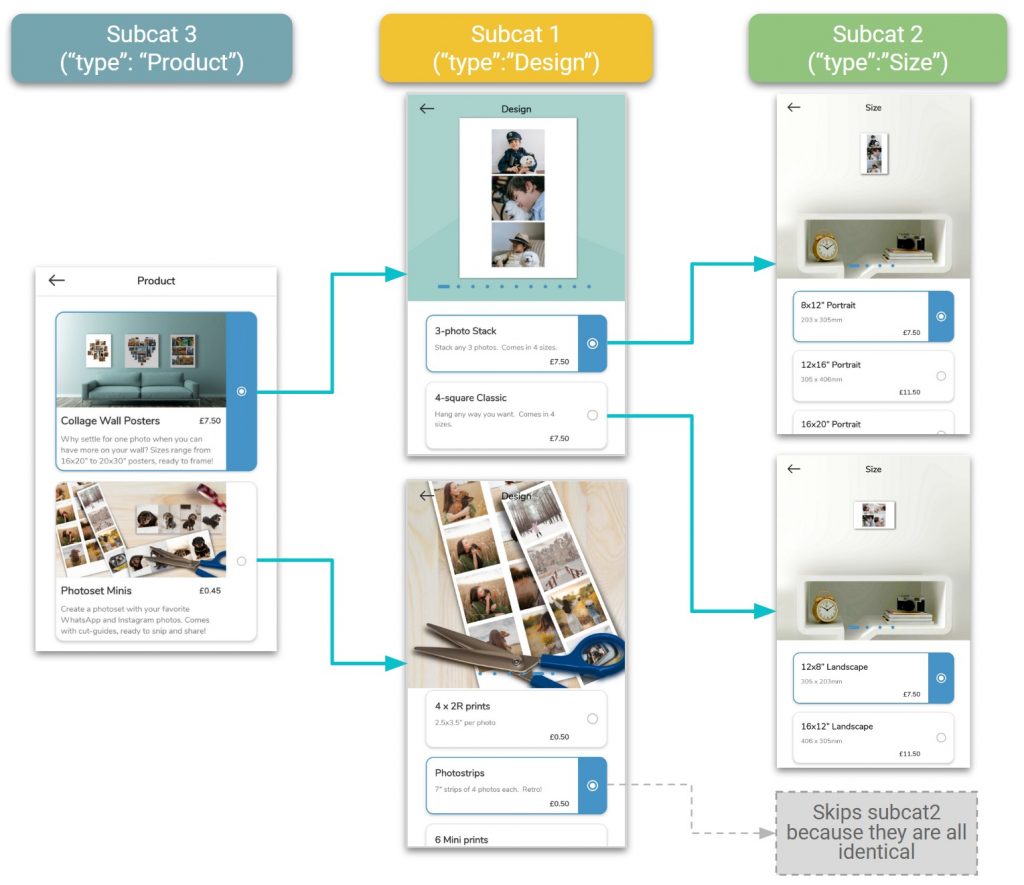
The schematic example here shows the setup of the following products in the Wall Decor category.
2 types of Wall Decor: Canvas and Poster
- In Canvas, there are 2 designs. A1 and A2 and each one comes in 2 sizes. Each size is available in Portrait or Landscape *
- Posters also comes in 2 designs A1 and A2.
- Design A1 comes in 3 sizes, but only size 3 comes in Portrait and Landscape. Sizes 1 only comes in Portrait and Size 2 only comes in Landscape.
- Design A2 only has 1 size, but available in Portrait and Landscape. Both orientations also comes with a Black or White picture frame.
* this is a fictional requirement just for illustration. Products can be setup as “rotatable”; such a product only requires you to define specs for a single orientation, and depending on the orientation of the user\’s chosen photo, the app responds accordingly. (using a Landscape photo will create a landscape oriented canvas both in the editor, the preview and the order we push to your fulfilment APIs)
UX Considerations
Because each subcat is a whole new screen in the app, as a general rule of thumb, we should aim for 3 steps (3 sub-cats). The system supports upto 8, but we have never seen that being used. (we hope we never have to!)
How many SKUs is that?
For a product hierarchy with x attributes and n number of choices at each stage, you will need to create x to the power of n.
Example: 3 subcats, each with 5 steps = 125 products.
This means you will have 125 rows for that product category in your OC Product Sheet, with 125 different labels created for Column A: “Model” !!
Demystifying the JSON which defines this
In the interest of brevity, we shall show just the top 12 product variants in the above example below. You will see 4 screens of how you would set up the 4 cats.
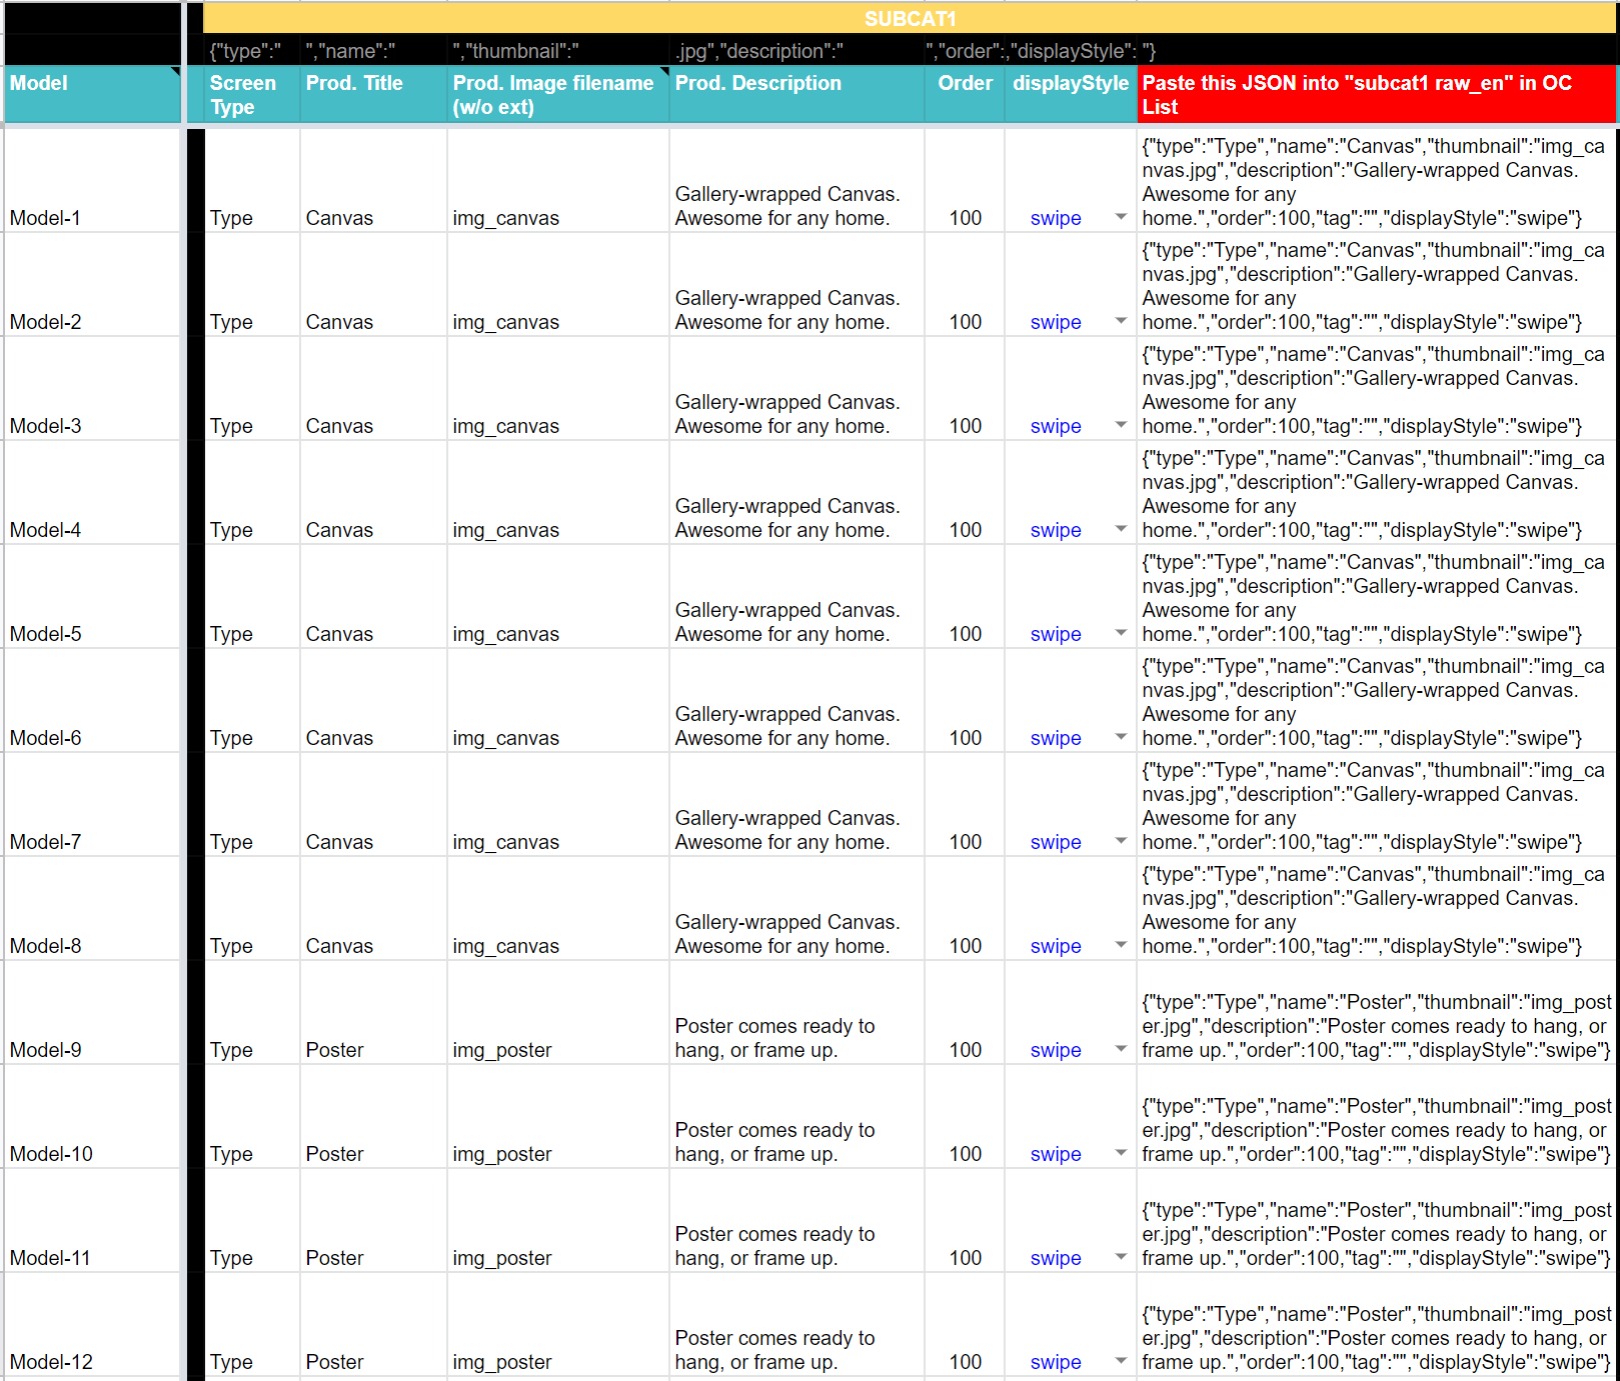
Although you see 12 rows here, only two of them will show up as Model-1 thru Model 8 are exactly the same. So this screen will present to the user two choices: Canvas or Poster? Using img_canvas.jpg and img_poster.jpg.
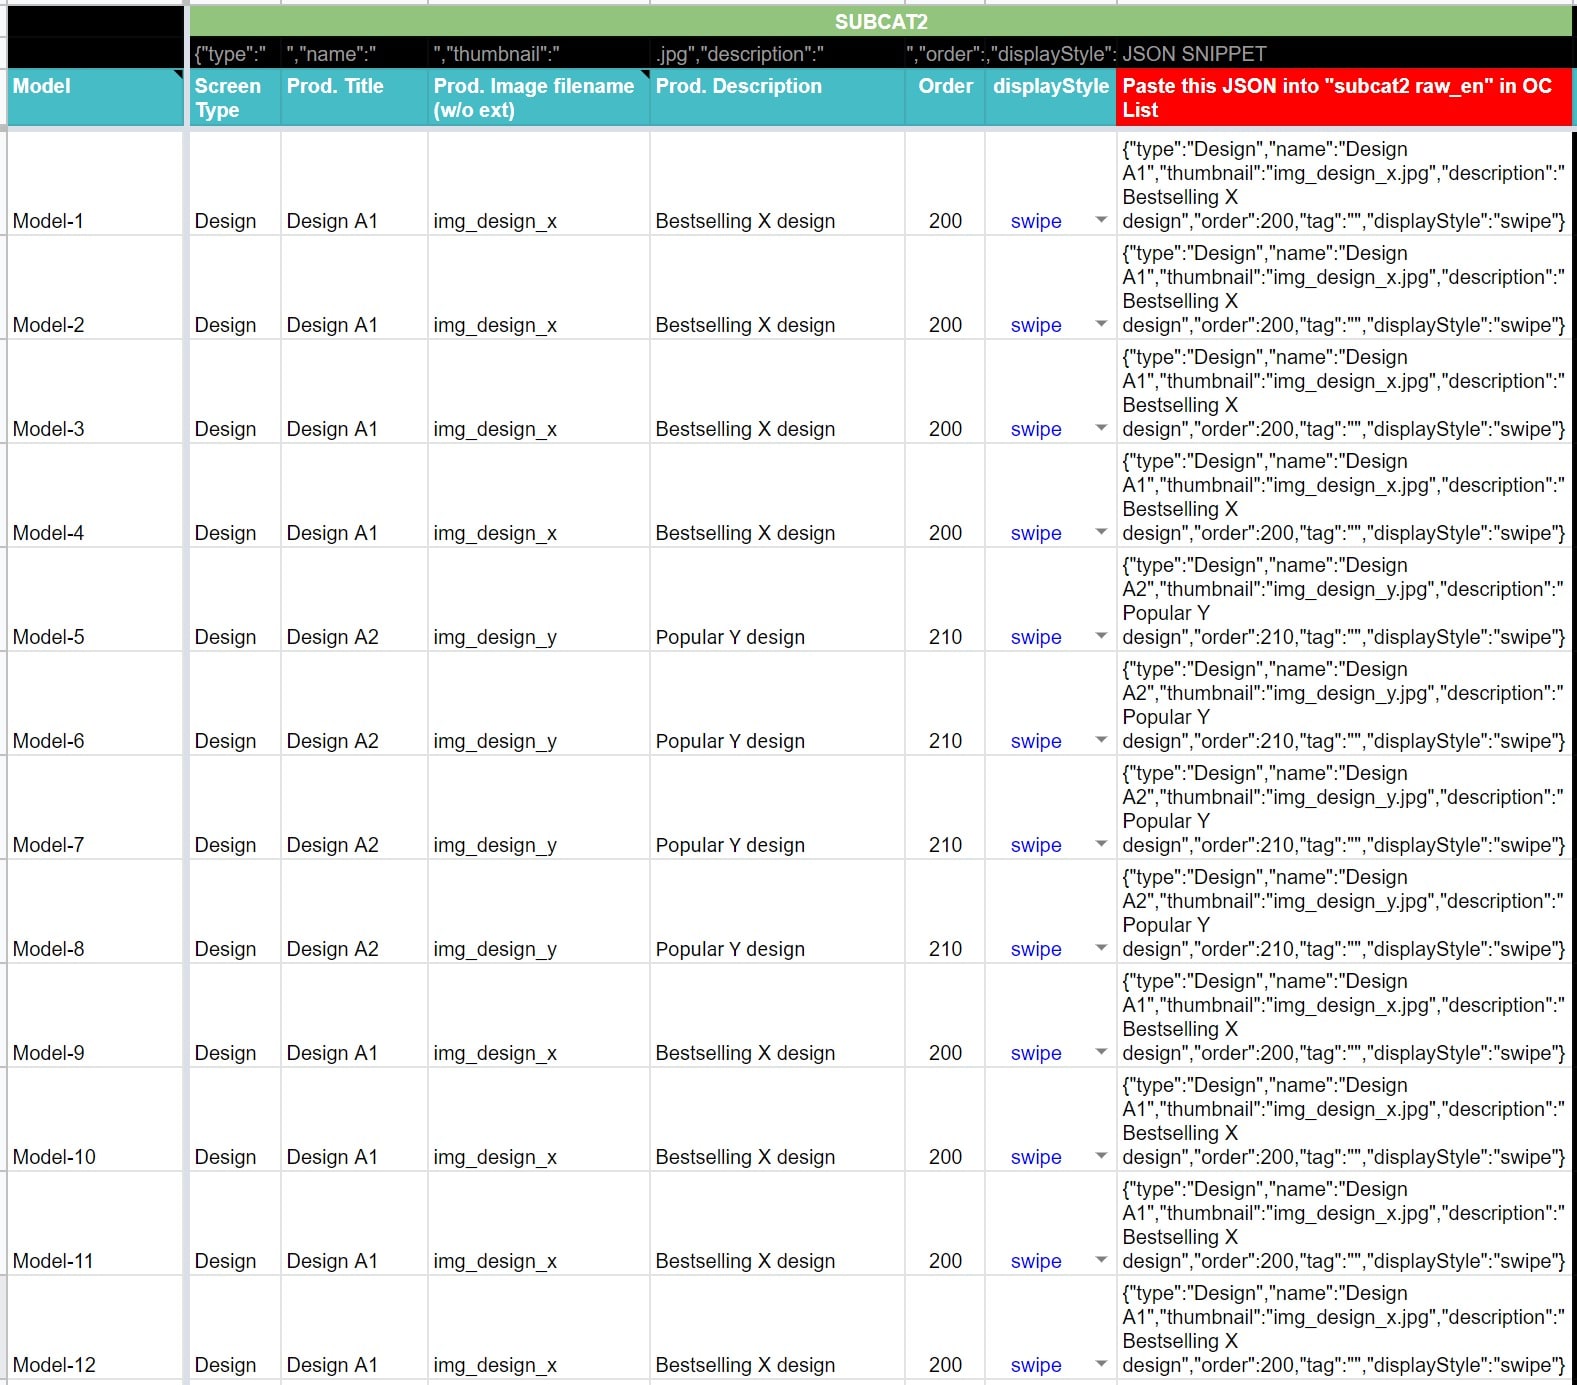
SubCat-2 is the one which asks “which design do you want?” Only two choices will be present (despite 12 rows) again because the only two unique groups of JSONs are “Design A1” and “Design A2”. Design A1 (Order = 200) will show up above Design A2 (Order = 210). If you want A2 to show up above, then make its Order number smaller than A1.
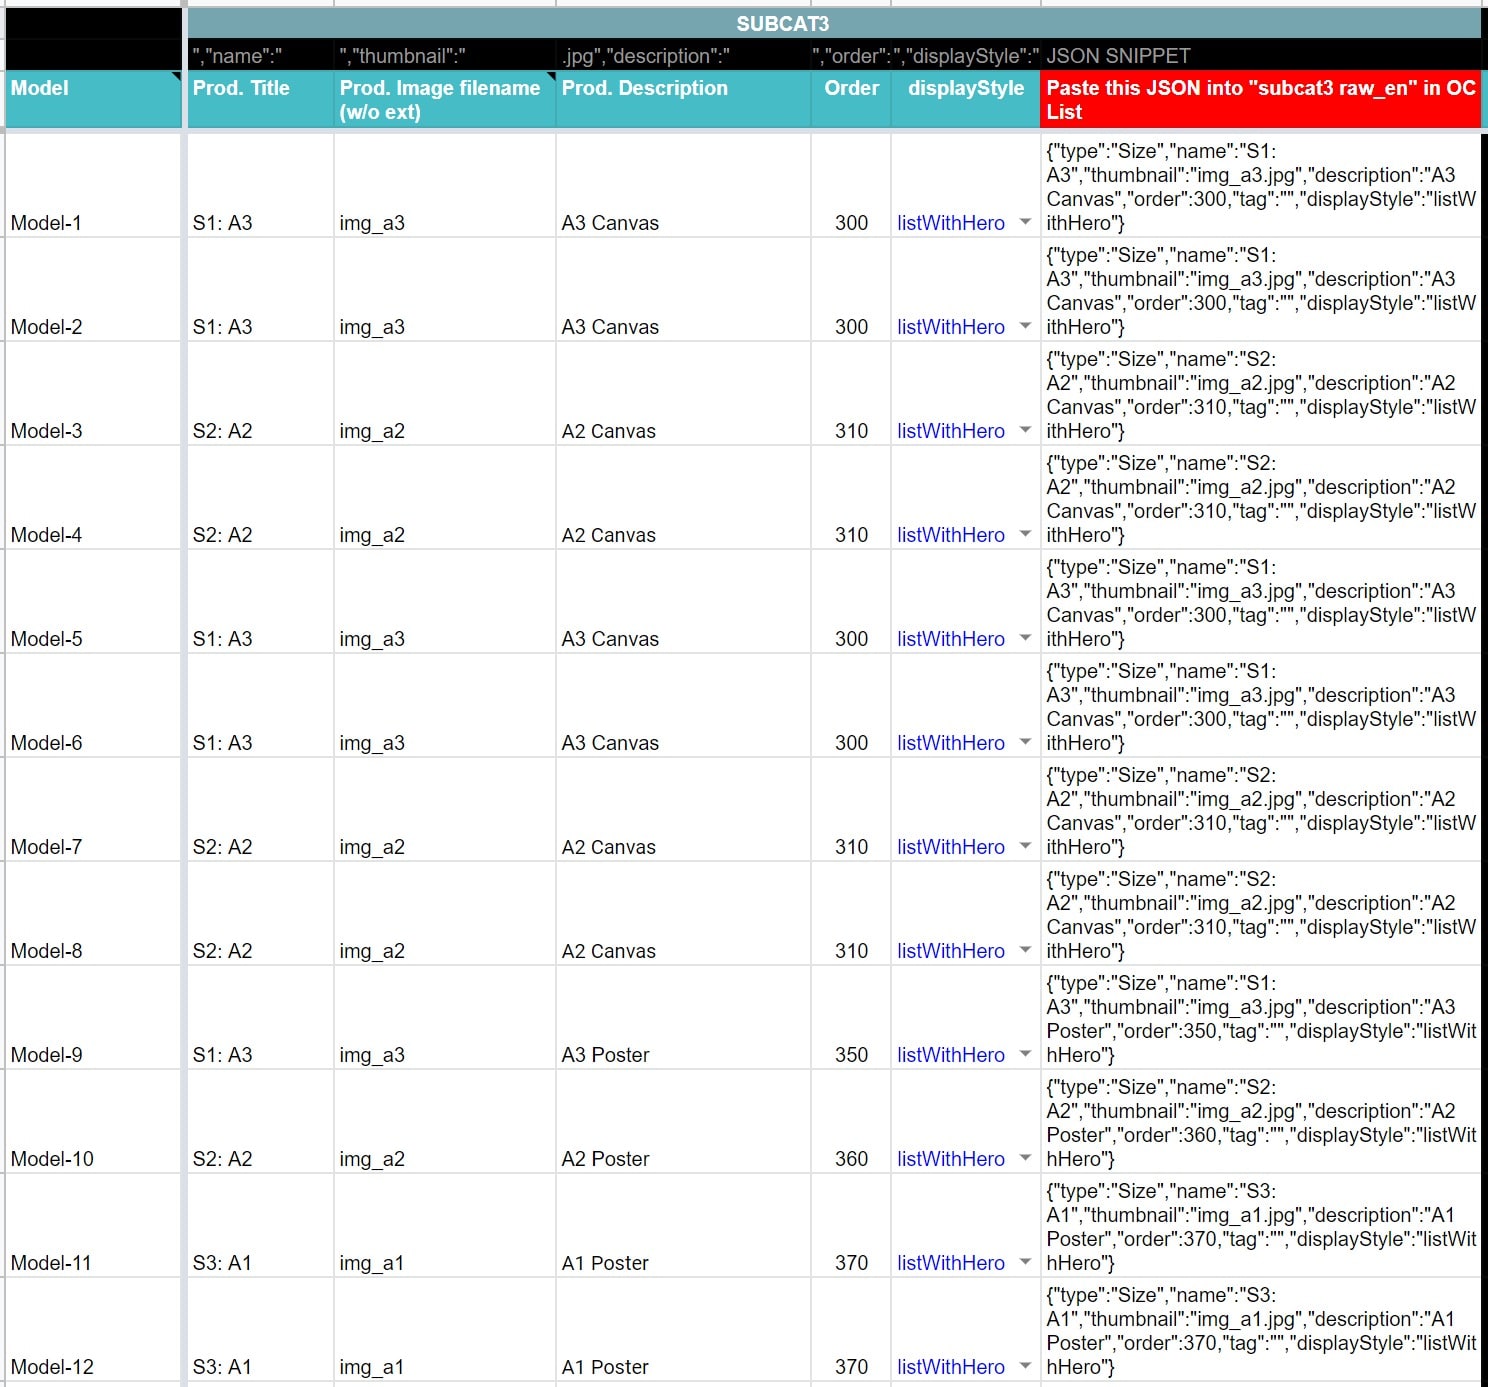
SubCat-3 asks you what “Size” you want. There are only 2 sizes for Canvas (A3 & A2) and 3 sizes for Posters here: A3, A2, and A1 sizes. Within the Canvas group, you will see that A3 (Order = 300) will show up on top, followed by A2 (Order = 310). Within the Poster group: A3 (Order = 350), then A2 (Order = 360) and finally A1 (Order = 370). We could have re-used Order = 300, 310, 320 respectively for Posters A3/A2/A1 and you will get the same effect, since in subCat3, Posters and Canvas won’t mix…so the Order numbers are only ranked *within* each group of Canvas or Poster.
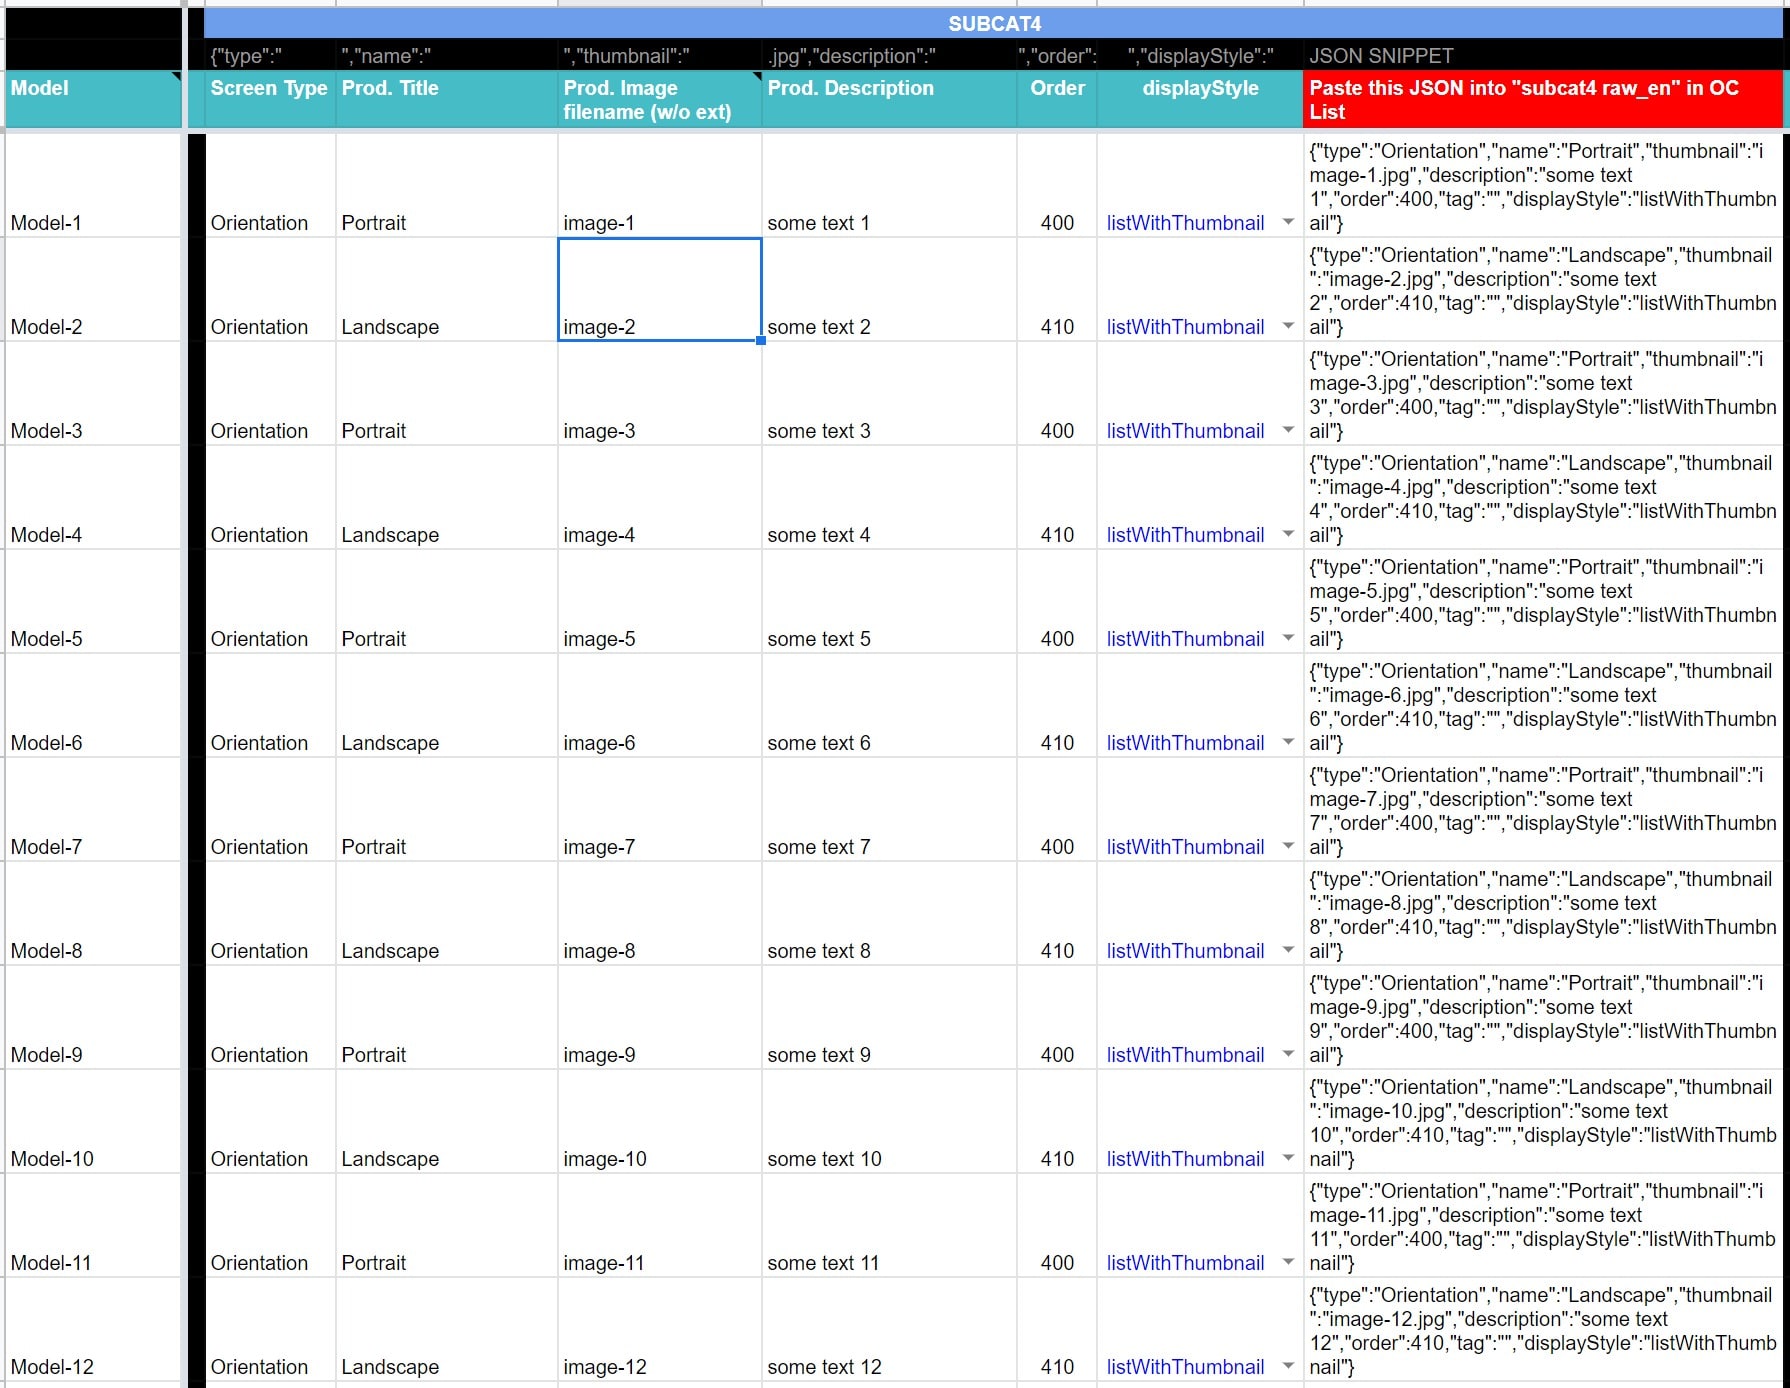
Subcat-4 is the lowest level in this case. So it has Order in the 400 series. In general, it is good practice to use the hundreds to denote the “levels” of your hierarchy and also align it with the SubCat numbers. (however, that is not required…your 400 series can be in SubCat8, leaving SubCat 4 thru 7 empty…but this would be counter-intuitive and confusing for the next person who has to maintain this.
Every single row in this chunk in SubCat4 are unique. So, every single item will show up at Step 4 of your app Wall Decor selection flow and the Portrait option (Order = 400) will show up on top of Landscape (Order = 410).